Editing custom heart rate zones (athlete + coach)
It is now possible to use your own custom heart rate zones instead of Sportlyzer default zones. This enables you to use up to ten zones instead of four. Custom zones can be edited by athletes or their coaches
1. Getting to the custom heart rate zones (athlete or coach).
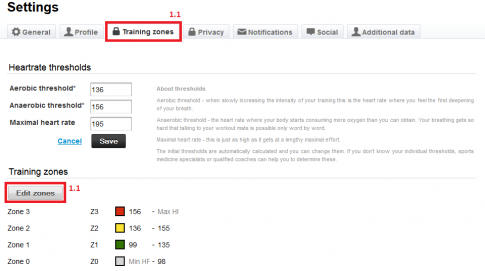
1.1 As an athlete go to the ‘Settings’ menu and choose ‘Training zones’. Click on the ‘Edit zones’ button. Now continue to section 2 of this tutorial.
1.2 As a coach choose an athlete from the ‘Coaching’ view and choose ‘Profile’ from the menu.
1.3 Scroll down the ‘Profile page’ and find Training zones at the bottom of that page. Click ‘Edit zones’.
2. If you use Sportlyzer’s defult zones, your training zones can be automatically calculated from your workout’s duration and subjective effort (useful in case you can’t record your heart rate). If you use your own training zone system and you want to get intensity analysis, you always have to log your time in zones by syncing with your heart rate monitor, importing a training data file or entering the minutes in zones manually. Click ‘OK’ to accept these terms.
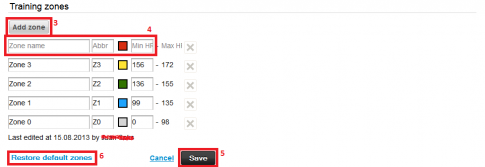
3. Click on the ‘Add zone’ button.
4. Edit the zone name, abbreviation and add the lower heart rate for that zone. You can also change the heart rates of other zones, even without adding a new zone. Note that when making a change in the heart rates in one zone, the heart rates in the zone below that one will automatically be recalculated. So it is wise to start editing the zones from the top.
5. Hit ‘Save’ to save your zones.
6. Click ‘Restore default zones’ to go back to the four default zones.


